Events
Create, edit, publish events and manage ticket types
Events List
The Events page shows all your events as cards. Use the filter tabs at the top to narrow the view:
- All - Every event regardless of status
- Published - Only live, visible events
- Draft - Events still being prepared
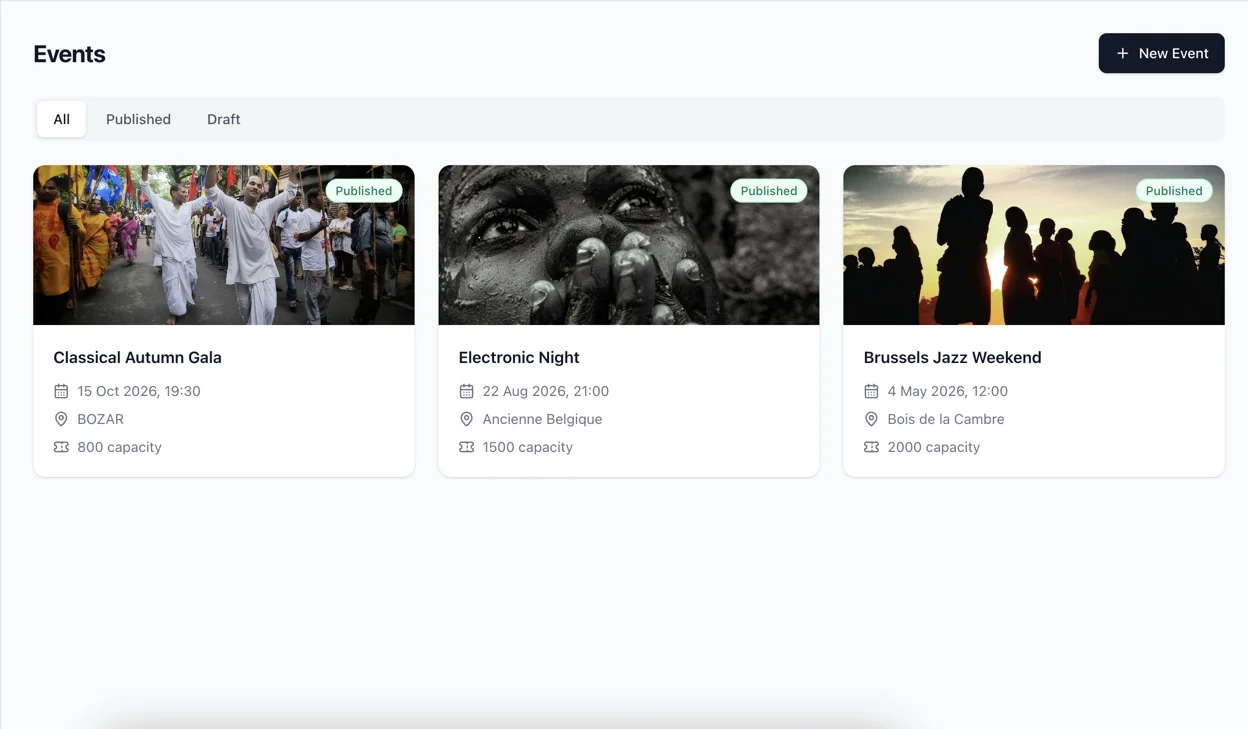
Each event card displays:
- Cover image (or a calendar icon if none uploaded)
- Status badge (top-right corner)
- Event name
- Date and time
- Venue name (if assigned)
- Capacity (if set)
Click any card to open the event detail page.
Event Statuses
| Status | Color | Meaning |
|---|---|---|
| Draft | Amber | Event is being prepared, not visible to buyers |
| Published | Green | Event is live and visible to buyers |
| Cancelled | Red | Event has been cancelled |
| Completed | Blue | Event has ended |
Creating an Event
Click + New Event from the events list to open the creation form.
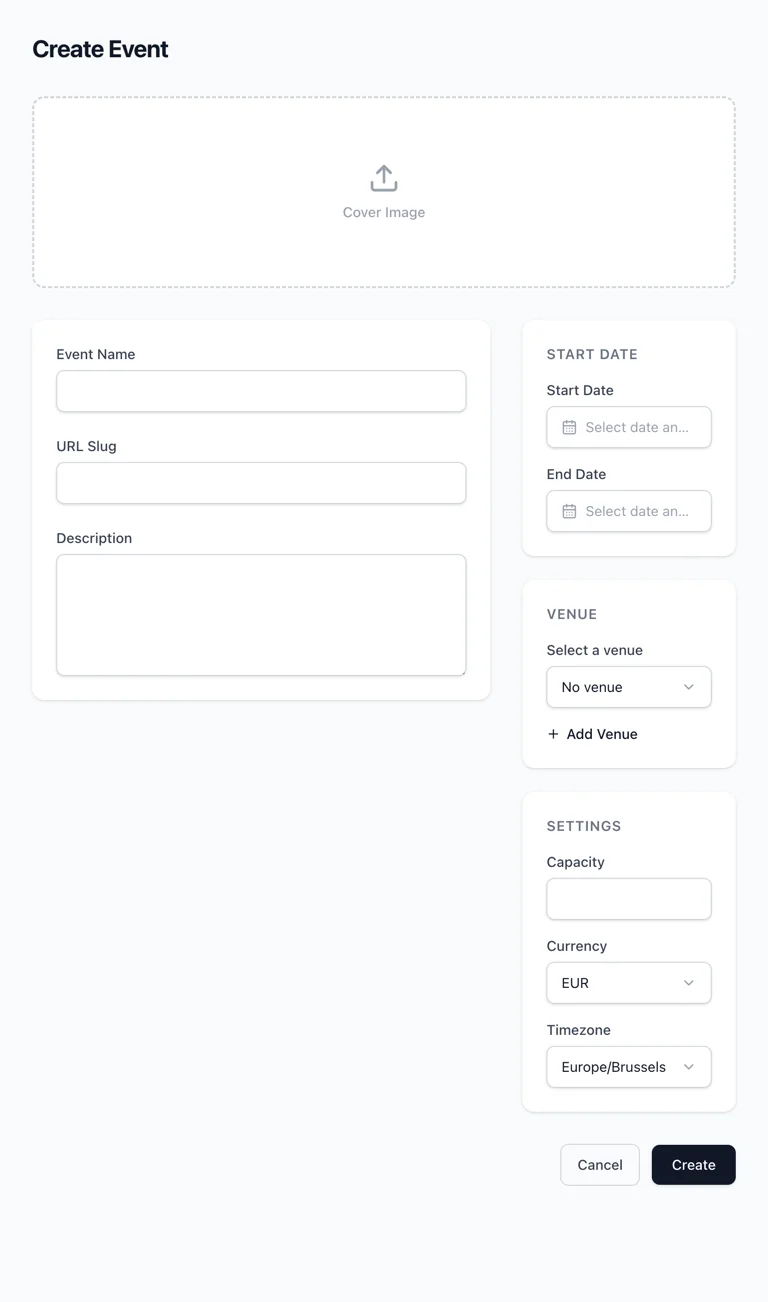
Cover Image
At the top, you can upload a cover image by dragging and dropping a file or clicking the upload area. This image is displayed on the buyer-facing event page and on ticket PDFs. Image files only (JPG, PNG, etc.).
Main Fields
| Field | Type | Required | Description |
|---|---|---|---|
| Event Name | Text | Yes | The public name of your event |
| URL Slug | Text | Yes | URL-friendly identifier (auto-generated from name). Used in the buyer URL: tickets.yourcompany.com/events/your-slug. Only lowercase letters, numbers, and hyphens allowed |
| Description | Textarea | No | Event description shown to buyers. Plain text only |
Date and Time
| Field | Type | Required | Description |
|---|---|---|---|
| Start Date | Date + Time picker | Yes | When the event starts. Displayed in the event's timezone |
| End Date | Date + Time picker | No | When the event ends. If not set, the event is treated as single-day |
Venue
| Field | Type | Required | Description |
|---|---|---|---|
| Venue | Dropdown | No | Select an existing venue or choose "No venue". You can also click + Add Venue to create one on the fly |
When you click + Add Venue, a small modal opens where you can enter the venue name and address. After creation, the new venue is automatically selected.
Settings
| Field | Type | Required | Default | Description |
|---|---|---|---|---|
| Capacity | Number | No | - | Maximum number of attendees. Leave empty for unlimited |
| Currency | Dropdown | Yes | EUR | Currency for all ticket prices. Options: EUR, USD, GBP |
| Timezone | Dropdown | Yes | Europe/Brussels | Used for displaying dates. Options: Europe/Brussels, Europe/Paris, Europe/London, America/New_York, America/Los_Angeles |
Click Create to save the event. It will be created with "Draft" status.
Event Detail
Click on any event to view its full detail page with tabs.
Hero Section
At the top, you see the cover image, event name, status badge, date range, and venue. The action buttons available depend on the event status:
| Button | Visible When | Action |
|---|---|---|
| Publish Event | Status is Draft | Makes the event visible to buyers. Asks for confirmation |
| Cancel Event | Status is Published | Cancels the event. Asks for confirmation |
| Republish Event | Status is Cancelled | Re-publishes a cancelled event. Asks for confirmation |
| Edit Event | Always | Opens the edit modal with all event fields pre-filled |
On mobile, buttons show only icons (no text) to save space.
Edit Event Modal
Opens a form identical to the create form, pre-filled with the current event data. You can also upload or replace the cover image. Click Save to apply changes.
Tabs
Overview Tab
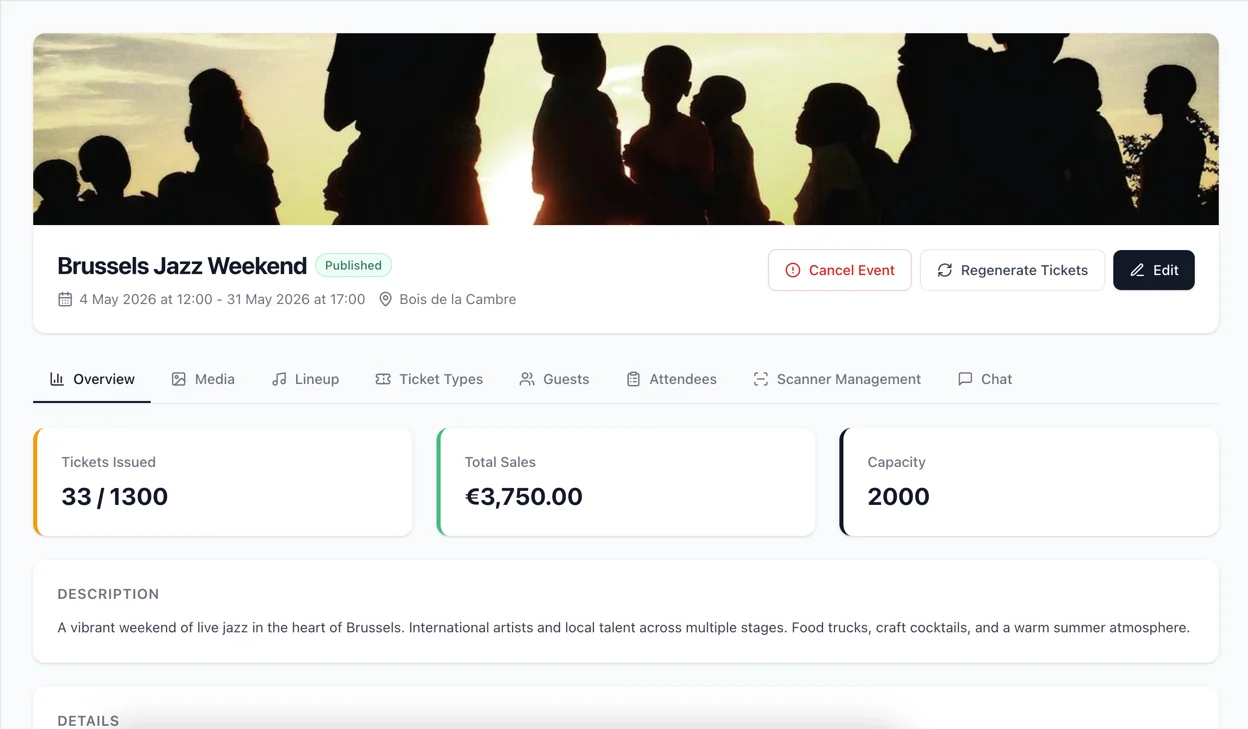
Displays a summary of the event:
Metric Cards:
- Tickets Issued - "X / Y" showing sold vs total available across all ticket types
- Total Sales - Revenue from completed orders for this event
- Capacity - Event capacity or "-" if not set
Event Details:
- URL Slug
- Currency
- Timezone
- Venue and address (if set)
Description (if set)
Tickets Tab
Manage ticket types for this event. Each event can have multiple ticket types (e.g., General, VIP, Early Bird).
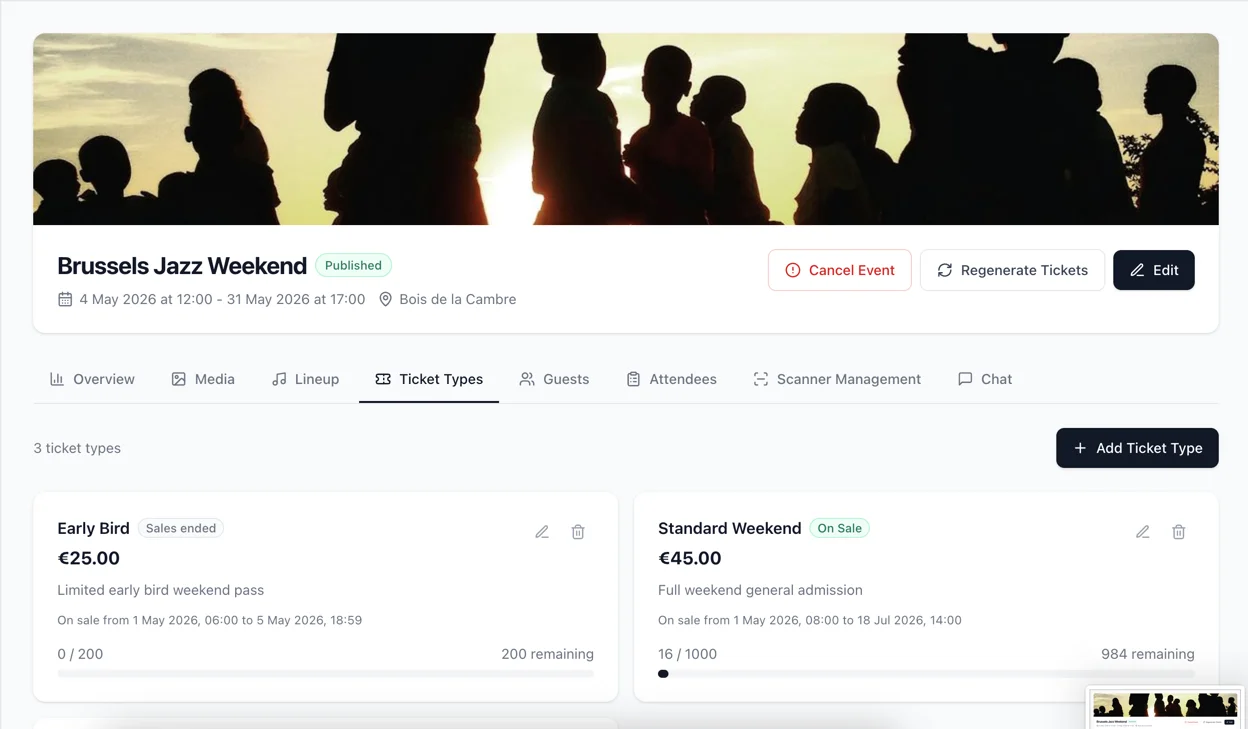
Click + Add Ticket Type to create a new one.
Ticket Type Card
Each ticket type is displayed as a card showing:
- Name and sale status badge
- Price (or "Free")
- Description (if set)
- Sales period (if dates are configured)
- Sales progress bar (green normally, amber if >80% sold, red if sold out)
- Sold/Available count and remaining tickets
- Edit and Delete buttons
Sale Status Badges
| Status | Color | Meaning |
|---|---|---|
| On Sale | Green | Tickets are available for purchase |
| Sold Out | Red | All tickets have been sold |
| Not Yet on Sale | Amber | Sales start date hasn't been reached |
| Sales Ended | Gray | Sales end date has passed |
Ticket Type Form
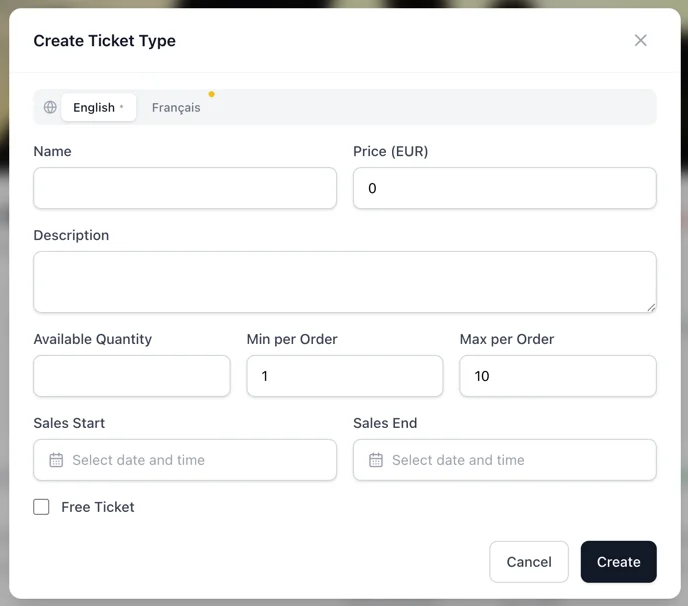
| Field | Type | Required | Default | Description |
|---|---|---|---|---|
| Name | Text | Yes | - | Display name (e.g., "General Admission", "VIP") |
| Price | Number | Yes | 0 | Price in the event's currency. Disabled when "Free Ticket" is checked |
| Description | Textarea | No | - | Additional info shown to buyers |
| Available Quantity | Number | Yes | - | Total number of tickets available for sale |
| Min per Order | Number | Yes | 1 | Minimum tickets a buyer must purchase |
| Max per Order | Number | Yes | 10 | Maximum tickets a buyer can purchase in one order |
| Sales Start | Date + Time | No | - | When tickets go on sale. Leave empty to start immediately |
| Sales End | Date + Time | No | - | When ticket sales close. Leave empty for no end date |
| Free Ticket | Checkbox | No | Unchecked | When checked, price is set to 0 and the price field is disabled |
Validation rules:
- If "Free Ticket" is not checked, the price must be greater than 0
- Available Quantity must be a positive number
- Min per Order must be at least 1
- Max per Order must be at least 1
Guests Tab
Manage guest invitations for this event. This is where you invite contacts from your Guest database and track their RSVP status.
Action Bar
- Checkbox in the header selects/deselects all guests
- Send Invitations button (green) appears when guests are selected. Shows the count of selected guests. Sends invitation emails with unique RSVP links
- Export CSV downloads the guest list as a CSV file
- + Invite to Event opens a modal to add guests from your contact database
Guest Table
| Column | Description |
|---|---|
| Checkbox | Select guest for bulk actions |
| Name | Guest's full name |
| Guest's email address | |
| Ticket Type | The ticket type assigned to this guest |
| Quantity | Number of tickets offered |
| Status | RSVP status badge |
| Actions | Send/resend invitation, delete |
RSVP Status Badges
| Status | Color | Meaning |
|---|---|---|
| Pending | Amber | Guest added but invitation not yet sent |
| Invited | Blue | Invitation email sent, awaiting response |
| Accepted | Green | Guest accepted the invitation, tickets generated |
| Declined | Red | Guest declined the invitation |
Invite to Event Modal
| Field | Type | Required | Description |
|---|---|---|---|
| Guest | Dropdown | Yes | Select from your contact database. Shows "Name (email)" |
| Ticket Type | Dropdown | Yes | Which ticket type to offer the guest |
| Quantity | Number | Yes (default: 1) | How many tickets to offer (1-10) |
After adding guests, their status is "Pending". Select them and click Send Invitations to send the email.
Invitation Flow
- Add guests via + Invite to Event
- Select guests with checkboxes
- Click Send Invitations
- A green success banner confirms the emails were sent
- Guest status changes from "Pending" to "Invited"
- When a guest accepts via the RSVP link, status changes to "Accepted"
- If a guest declines, status changes to "Declined"
- You can resend an invitation by clicking the send icon on any guest row
Attendees Tab
Read-only view of all ticket holders for this event, including both purchases and invitations.
Attendees Table
| Column | Description |
|---|---|
| Name / Email | Ticket holder's name and email |
| Ticket Type | Which ticket type they hold |
| Status | Ticket status badge |
| Source | How they got the ticket |
| Issued At | When the ticket was generated |
Ticket Status Badges
| Status | Color | Meaning |
|---|---|---|
| Issued | Green | Valid ticket, not yet used |
| Checked In | Blue | Ticket has been scanned at the event |
| Revoked | Red | Ticket has been revoked |
| Expired | Gray | Ticket has expired |
Source Badges
| Source | Color | Meaning |
|---|---|---|
| Purchase | Gray | Ticket was bought through the checkout flow |
| Invitation | Amber | Ticket was generated via a guest invitation |
The Export CSV button downloads the full attendee list.
Scanners Tab
Manage scanner devices for ticket check-in at the event.
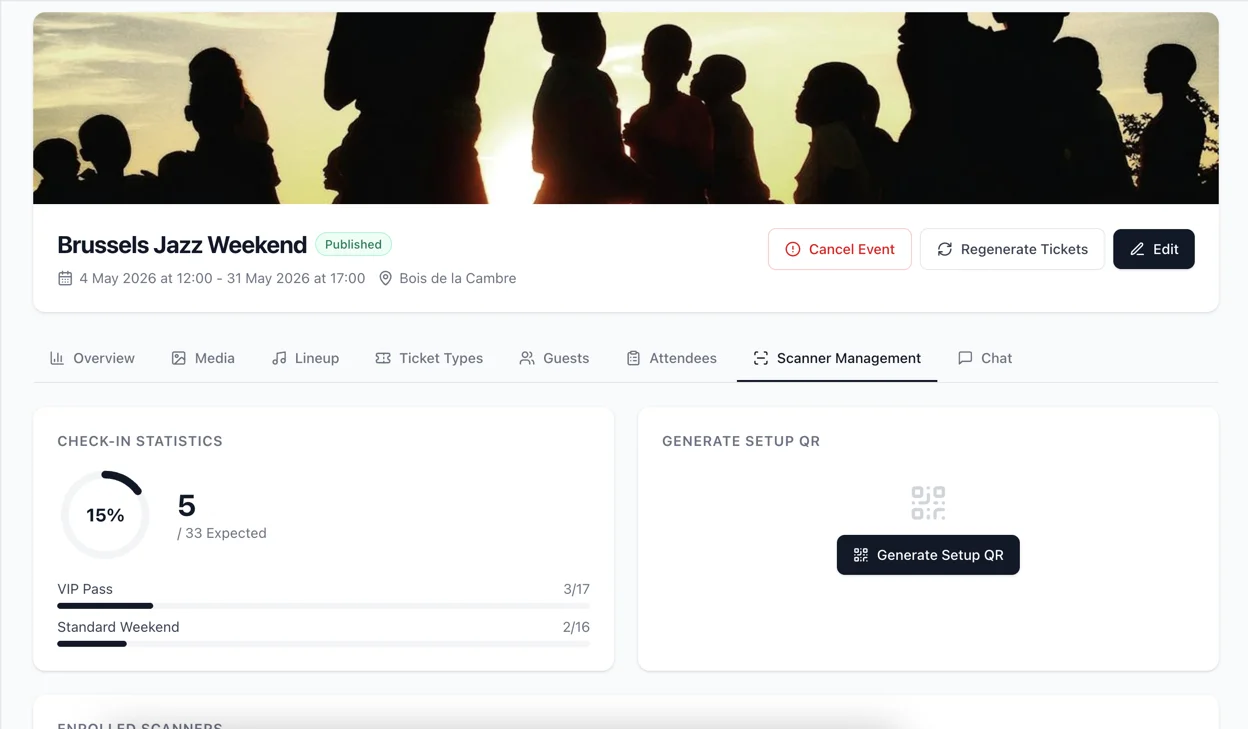
Check-in Statistics
A circular progress chart shows the check-in rate:
- Percentage of tickets checked in (center of the circle)
- "X / Y expected" count below
- Breakdown by ticket type with mini progress bars
Generating a Setup QR Code
To enroll a scanner device, you generate a setup QR code that the scanner app scans.
Click Generate Setup QR to open the form:
| Field | Type | Required | Default | Description |
|---|---|---|---|---|
| Expires in (hours) | Number | Yes | 24 | How long the QR code remains valid (1-168 hours) |
| Gate ID | Text | No | - | Optional identifier if the venue has multiple gates |
After generating, the QR code is displayed on screen. The scanner operator scans it with the scanner app, which exchanges the token for an API key and becomes enrolled.
You can generate a new QR code at any time (the old one is invalidated).
Enrolled Scanners
Lists all enrolled scanner devices:
- Device name (or "Unknown device")
- Enrollment date
- Last seen date (last API call)
- Revoke button to remove access (red text)
Revoking a scanner immediately invalidates its API key. It will no longer be able to perform check-ins.